Monday 12 December 2011

'Joy' Christmas Gift Tags

handmade

handmade
So as promised, here are the second lot of Christmas gift cards. You can see how to make the glitter star gift tags here.

Photobucket

You will need:

Card
Pencil
Scissors
PVA glue
Glitter - either to match or contrast with your card
Ruler
Hole punch
Sheet of paper

Method:

1. Divide your piece of card up into squares or rectangles. Size is up to you - the one in this picture is about 2 inches square, but I made some smaller ones too.
2. Cut out using pinking shears - this will give you a nice fancy edge but if you don't have them, don't worry, regular scissors will be fine too!
3. Using a hole punch, punch a hole in one of the corners of your shape - this is for threading the ribbon through.
4. The glue I used had a thin nozzle for the glue to come out of, otherwise using a paintbrush, write the word "joy" on your square.
5. Holding the square over the sheet of paper, tip glitter all over the glue word. Make sure that it's completely covered.
6. Leave your square on the piece of paper to dry.
7. Repeat for all remaining squares. You could try different words too, I made some which said "snow" and "noel"
8. When tags are dry (I left mine in a warm room overnight to make sure they were completely dry), tap each tag over the paper on the surface to get rid of any excess glitter. Move all tags to the side.
9. Carefully tip any glitter on the paper back into the tube or container it came from.
10. Write on the back of them, and use them to decorate your gifts!

Friday 9 December 2011

Handmade Christmas Gift Tags

It's beginning to look a lot like Christmas in our little house! The tree is up (which by the way, Izzy is obsessed with. If she's not laying in front of it, she's snuggling up under it!) and everything is officially in full swing.

Photobucket

For once, I actually have all Adam's presents sorted. I still have a couple of bits to get him, but I actually know what I'm getting. That in itself is a little Christmas miracle - normally I have absolutely no idea, that boy is impossible to buy for!

Shopping for Christmas presents then wrapping them up is easily one of my favourite things about Christmas. I love to give gifts, especially when you can tell the person you've got them for really loves it! And I like to try and make my gifts look nice too, especially since I have them sitting under my tree for the entire month. This month, I thought it would be really nice to make my own gift tags for the presents. It was so easy, and I enjoyed doing it so much, I thought I'd share how I did them.

handmade

handmade

Handmade gift tags

You will need:

Card
Pencil
Scissors
PVA glue
Glitter to match card
Star template or stencil
Hole punch
Sheet of paper

Method:

1. I used a star shaped cookie cutter, and drew around this onto some red card.
2. Cut out the stars.
3. Using a hole punch, punch a hole in one of the corners of the star. We'll use this to thread the ribbon through later.
4. Spread glue thinly and evenly over one of your cardboard stars.
5. Holding the star over the sheet of paper, tip glitter all over the star on the side that you've just spread glue onto. Make sure that it's completely covered.
6. Leave your star on the piece of paper to dry.
7. Repeat for all remaining stars.
8. When stars are dry (I left mine in a warm room overnight to make sure they were completely dry), tap each star over the paper on the surface to get rid of any excess glitter. Move all stars to the side.
9. Carefully tip any glitter on the paper back into the tube or container it came from.
10. Write on the back of them, and use them to decorate your gifts!

Note: After drying, I noticed my stars were a little bit bent in the middle. To fix this, I just laid the stars on my desk, and put a heavy book over them. After a couple of hours, they were perfectly flat again!

Check back on Monday for the how-to for the 'Joy' Christmas tags that I made! Hope you have a wonderful weekend.

Thursday 8 December 2011

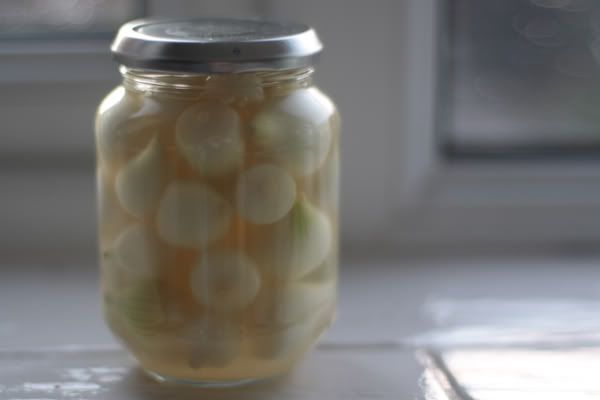
Pickled Onions

Let me ask a question - does any other country eat pickled onions, or is it a British thing? I can't remember if I ever saw them when I spent some time abroad, but to be honest, although I've always liked them I've only recently become obsessed with them!

If you've never had them, or even heard of them, they're definitely something to try if you like onions. Tart, crunchy and ever so slightly sweet, they go perfectly with a salad, sandwich, cheese or just as a quick snack - popping one straight out of the jar and into your mouth ;)

christmas, vegan, british, vegetarian, party food,  onions, pickle,  pickled onions, easy,  snack, side dish,

Pickled Onions

Ingredients:

500ml jar
300g pickling onions (or just tiny onions - these were about 1" diameter at the most)
1 tbsp sugar
White wine vinegar

Method:

1. Sterilise your jar. I just boiled mine along with the lid for about a minute.
2. Prepare onions - cut off the bottoms, and then make a slit in the side and peel off the skin and top layer of onion.
3. Put the tbsp of sugar into your jar, and add just enough boiling water to get all the sugar to dissolve.
4. Add onions to jar.
5. Add vinegar, ensuring that all onions are covered.
6. Store in a cupboard or pantry until ready to eat, leave them for at least two weeks so they can properly pickle themselves, but they will last for ages. My Mum used to always make hers at the beginning of October to eat at Christmas, and they'd last us for months.

Monday 5 December 2011

'Tis the Season

During this time of year, with the holidays fast approaching it's a good idea to have some party food ideas that don't take long to put together. Friends and family tend to stop by with only a moments notice and stay for a drink or two, and I always like to have something to serve them when they do. Not only that, but it's the season of parties and whether you're hosting or attending them, it's always good to have a plate of something delicious to take with you!

During December, I'm going to be posting lots of wonderful recipes which are perfect for the holiday season.

Starting with these: Candied Nuts! They're perfect as a last minute thing to throw together while your guests are on their way over. Just four simple ingredients which you'll probably have in your cupboards anyway, and they take about 10 minutes to make!

party food, last minute, easy, nuts, candied nuts, walnuts, pecans, almonds, vegan, vegetarian

Ingredients:

1 cup of whole nuts - any kind you like!
Knob of butter or margarine

¼ cup sugar
Splash of vanilla extract

Method:

1. Line a baking tray with greaseproof/parchment paper
2.. Melt butter in a frying pan over medium heat. You don't need a lot of butter, just a little and you could even omit it completely if you wanted.
3.. Add nuts and sugar.
4. Stir to coat the nuts in sugar, the sugar should start to melt and turn a light brown colour. Keep stirring to coat fairly evenly.
5. Add splash of vanilla and stir. The vanilla will cause the mixture to sizzle up but that's fine.
5. Tip out onto prepared baking tray. Try to spread them evenly so they don't stick together too much.
6. Leave to cool, then break up any that have still managed to stick together, and serve!

Note: These are especially good while they're still slightly warm, and you might want to double or even treble the recipe depending on how many guests you're having as they're so more-ish!

Saturday 3 December 2011

It's the most wonderful time of the year!

I've got a naked Christmas tree in the corner of my living room, a steak and mushroom pie innards in the slow cooker, I managed to make it into town for some bits before it started pouring with rain and now I'm cuddled up on the sofa with my puppy. A perfect cozy day!

I can't wait for Adam to get home from work so we can get our tree decorated! This Christmas feels really special to me, not least because we're getting married two days after Christmas day. We're properly settled in our house - last year, we'd only moved in a month before and money was a bit tight after two years of renovations. I feel like I'm in a really happy place this year, and it really does feel wonderful.

I've got quite a few little projects and recipes (including a series of party food ideas!) to post throughout December so please check back often! Hope you have a lovely weekend!

LinkWithin

Related Posts Plugin for WordPress, Blogger...